Introduction
On July 2, 2015, I published my first blog post—an article about the importance of owning your own domain and publishing your work on a platform you control. At the time, my site ran on WordPress hosted by Reclaim Hosting, who proved to be an excellent partner.
However, as my career wound down, I realized that WordPress offered far more features, with associated complexity, than I needed for the kind of content I post. What I really wanted was a simple, low-maintenance, and inexpensive static site. This post describes my journey toward that goal.
Desired Workflow
I’ve always enjoyed using WordPress to create content and manage associated media files. With that in mind, I decided to continue using WordPress locally on my own machine as a comfortable writing and organization environment.
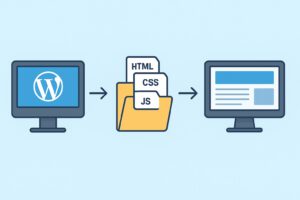
My goal was to generate a visually and functionally identical static site—built entirely with HTML, CSS, and JavaScript—that mirrors my local WordPress site. Once generated, the static files could be uploaded to a hosting service, making my content available to others with minimal cost and complexity.
Local WordPress Site
The first step in moving my blog from a hosted WordPress instance to a local setup was to install LocalWP, an OS X-compatible WordPress development environment. Once installed, I configured LocalWP to host a WordPress site that would eventually become flanagan.io.
When the site is “started” within LocalWP, it becomes available at flanaganio.local and administered at flanaganio.local/wp-login.php. LocalWP automatically handles everything behind the scenes—creating the necessary database(s), updating the /etc/hosts file, and installing WordPress itself.
After setting up the local environment, I backed up my hosted WordPress site and imported the backup into WordPress running on LocalWP. At this point, flanaganio.local functioned identically to my hosted site at kelly.flanagan.io It seemed like the next step would simply be to install the Simply Static plugin, run it, and host the resulting files somewhere. Not quite!
Lessons Learned and Adjustments
My first attempts at generating a static version of the blog using Simply Static (and other plugins) produced poor results. I quickly discovered that not all WordPress themes work well when converted to static HTML, and several of my plugins—especially those for tables, maps, comments, and contact forms—did not behave properly.
After some research and experimentation, I found the Neve theme to be lightweight, fast, and compatible with static-site generation. Along the way, I made several other improvements:
- Switched to the Neve theme
- Merged two blogs (trailertravels.flanagan.io and kelly.flanagan.io) into one unified site, flanagan.io
- Rebuilt tables as static HTML
- Replaced the map plugin with Easy Google Maps
- Removed comments and the contact form
- Improved the overall look, feel, and usability
With these refinements in place, I was finally ready to generate a working static version of my site.
Creating the Local Static Site
I wanted each post’s featured image to appear when sharing its URL on social media. To achieve this, I added Open Graph (OG) tags to the header of every post. I implemented this by creating a PHP function and adding it to the Neve theme’s functions.php file.
I modified Running the Simply Static plugin produces a folder containing all the files needed to host an equivalent static site. The plugin includes several configuration options, and I chose to use relative paths so that I could test the static site locally and deploy it anywhere without changing URLs.
Simply Static required a root path of /, and I had to manually include a few additional files to ensure they were captured in the export. I also selected the option to include RSS related tags and the /feed/index.xml file. Otherwise, I left most defaults intact.
I repeated the cycle many times: edit in WordPress → generate static version → test the result. This iterative process ensured that links, images, and media were all working as expected.
To preview the static site locally, I used Caddy, a lightweight and secure web server. My Caddyfile looked like this:
flanagan.io {
    root * "/Users/kelly/Local Sites/flanaganio/app/curr_public_static"
    file_server
    tls internal
}
Before running Caddy, I added an entry in /etc/hosts mapping flanagan.io to 127.0.0.1. With that in place, I could open https://flanagan.io in a browser and inspect my static site just as it would appear online.
Hosting the Static Site on AWS
Because my blog serves a small audience—mostly family, friends, and a few curious readers—I wanted a hosting solution that was reliable, low-cost, and ideally free. Amazon Web Services (AWS) met those needs almost perfectly.
I host my site using AWS S3, which stores the static files, and CloudFront, which provides global content delivery and HTTPS support (S3 by itself only supports HTTP).
I use two S3 buckets:
- One for flanagan.io, which stores and serves the site content.
- A second for www.flanagan.io, which simply redirects to the main domain.
Other AWS services supporting my setup include:
- AWS Certificate Manager – provides SSL/TLS certificates for HTTPS
- Route 53 – manages domain DNS
- Identity and Access Management (IAM) – controls permissions
- API Gateway and Simple Notification Service (SNS) – power my contact form
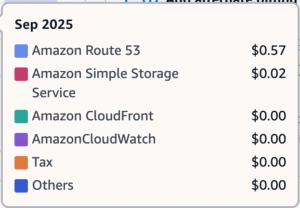
For September 2025, my total AWS cost was $0.59. Route 53’s base cost is $0.50/month, meaning file uploads and access requests accounted for only nine cents. Most of the other services fall comfortably within AWS’s free tier.
When I first updated my blog, I would manually upload all of the static files to my S3 bucket every time I made a change. After waiting for the upload to finish, I also had to wait for CloudFront’s caches to refresh before anyone could see the updated content.
I refined this workflow by creating a Makefile that leverages the AWS CLI to synchronize only files that have changed, rather than uploading the entire site every time. Previously, Simply Static touched all files in my site regardless of whether they were modified. This caused full-site uploads on each update, wasting time and increasing bandwidth costs.
With the updated workflow, Simply Static now exports files to curr_public_static, which are then compared to those in prev_public_static. Files that differ are copied to diff_public_static, and only these files are uploaded to S3. This selective syncing significantly reduces upload time, bandwidth usage, and unnecessary overwrites.
To ensure updates are immediately visible to visitors, the Makefile also automatically invalidates the relevant CloudFront caches. Additionally, I integrated git commands into the Makefile so that each update is backed up to my GitHub repository, providing both version control and a reliable off-site copy. Once the previous site is backed up, the files in curr_public_static are moved to prev_public_static to prepare for the next update. My Makefile is included at the end of this post.
Contact Form
To add a simple, serverless contact form, I combined HTML, CSS, and JavaScript with AWS’s API Gateway and SNS. The form sends a POST request to an API Gateway endpoint, which triggers SNS to email me the sender’s address, subject, and message. I also included an OPTIONS method to handle CORS preflight requests required by browsers. This approach eliminates the need for any backend server and, given the light usage, stays well within AWS’s free tier.
Workflow
My workflow is entirely manual but easy to follow:
- Open the LocalWP app on my laptop.
- In a browser, open flanaganio.local and log in to WordPress.
- Create or edit posts, upload media, and make any changes.
- Run the Simply Static plugin to generate the static files.
- Quit LocalWP.
- Start Caddy and open flanagan.io in a browser to verify everything looks right.
- Quit Caddy.
- Run make deploy which executes several make targets. This converts the relative paths in /feed/index.xml to absolute paths, uploads any changed files to the S3 bucket and invalidates the CloudFront caches, ensuring that the latest content is immediately visible to visitors. It also make a backup, just in case.
Summary
I successfully migrated my blog from a hosted WordPress service costing nearly $150 per year to a self-hosted static site that costs less than $10 per year to operate. The move gave me:
- A cleaner, faster blog
- Full control over my content
- Lower ongoing costs
- And a lot of satisfaction in learning something new
The result is exactly what I wanted—a simple, durable, and elegant home for my writing.
Makefile
# Directory paths
PREV_DIR := /Users/kelly/Local Sites/flanaganio/app/prev_public_static
CURR_DIR := /Users/kelly/Local Sites/flanaganio/app/curr_public_static
DIFF_DIR := /Users/kelly/Local Sites/flanaganio/app/diff_public_static
S3_BUCKET := s3://flanaganio-static/
CF_DISTRIBUTION_ID := E1JU16LZYIE94I
GITHUB_DIR := /Users/kelly/Local Sites/flanaganio/app/flanagan.io
LOCAL_DIR := $(PREV_DIR)
COMMIT_MSG := "Update static site $(shell date '+%Y-%m-%d %H:%M:%S')"

# Rsync options
RSYNC_OPTS := -ac --delete --compare-dest="$(PREV_DIR)/"

# Full deployment: diff, S3 upload, CloudFront, GitHub
deploy: fix_feed diff_dir s3_upload invalidate_cloudfront_caches github_copy curr_to_prev
	@echo "Deployment complete."

# Compare current vs previous and generate diff directory
diff_dir:
	@echo "Comparing curr_public_static and prev_public_static"
	@rm -rf "$(DIFF_DIR)"
	@mkdir -p "$(DIFF_DIR)"
	@rsync $(RSYNC_OPTS) "$(CURR_DIR)/" "$(DIFF_DIR)/"
	@file_count=$$(find "$(DIFF_DIR)" -type f | wc -l | tr -d ' '); \
	total_size=$$(du -sh "$(DIFF_DIR)" | awk '{print $$1}'); \
	echo "Comparison complete."; \
	echo "Files copied to diff_public_static: $$file_count"; \
	echo "Total size of changed files: $$total_size"

# Upload diff directory to S3
s3_upload:
	@echo "Uploading diff_public_static to $(S3_BUCKET)"
	@aws s3 sync "$(DIFF_DIR)/" "$(S3_BUCKET)" --exact-timestamps --quiet
	@echo "Upload complete."

# Invalidate CloudFront caches
invalidate_cloudfront_caches:
	@echo "Creating CloudFront invalidation."
	@aws cloudfront create-invalidation --distribution-id "$(CF_DISTRIBUTION_ID)" --paths "/*" > /dev/null 2>&1
	@echo "Invalidation request submitted."

github_copy:
	@echo "Syncing prev_public_static to GitHub."
	@rsync -a --delete --exclude ".git/" --exclude ".DS_Store" --quiet "$(LOCAL_DIR)/" "$(GITHUB_DIR)/"
	@cd "$(GITHUB_DIR)" && \
	if [ -n "$$(git status --porcelain)" ]; then \
		UPDATED_COUNT=$$(git status --porcelain | wc -l | tr -d ' '); \
		git add . >/dev/null; \
		git commit -m "Update static site $$(date '+%Y-%m-%d %H:%M:%S')" >/dev/null; \
		git push --quiet origin main; \
		TOTAL_SIZE=$$(du -sh "$(GITHUB_DIR)" | awk '{print $$1}'); \
		echo "Updated $$UPDATED_COUNT files to GitHub (current size $$TOTAL_SIZE)."; \
	else \
		echo "No changes to commit."; \
	fi
	@echo "GitHub sync complete."

# Copy all content from curr_public_static to prev_public_static
curr_to_prev:
	@echo "Copying content from curr_public_static to prev_public_static"
	@rsync -a --delete "$(CURR_DIR)/" "$(PREV_DIR)/"
	@echo "Copy complete."

fix_feed:
	@echo "Converting relative URLs to absolute in RSS feed."
	@sh -c "if [ -f '$(CURR_DIR)/feed/index.xml' ]; then sed -i '' -E \
		's|/wp-content/|https://flanagan.io/wp-content/|g; \
		 s|href=\"/|href=\"https://flanagan.io/|g; \
		 s|src=\"/|src=\"https://flanagan.io/|g; \
		 s|srcset=\"/|srcset=\"https://flanagan.io/|g; \
		 s|<link>/|<link>https://flanagan.io/|g' \
		'$(CURR_DIR)/feed/index.xml'; \
		echo 'RSS feed URLs updated safely.'; \
	else \
		echo 'RSS feed not found at $(CURR_DIR)/feed/index.xml'; \
	fi"

# Clean diff directory
clean:
	@echo "Cleaning up diff directory"
	@rm -rf "$(DIFF_DIR)"
	@echo "Done."